
How To Install a Smart Thermostat (and How Much It Could Save You!)
A smart thermostat is a handy tool for reducing your monthly energy bill and cutting carbon emissions. Using artificial intelligence to learn your habits, a smart thermostat keeps your home feeling comfortable—the perfect temperature in either winter or summer—in the most efficient way possible.
So, when you’re at the office in the summer, the AC at home isn’t running all day, but you can still expect it to start up at the perfect time to cool the home by the time you return for the day.
With the rising popularity of smart thermostats, many homeowners are wondering if they can install one themselves. If you fall into that category, you’re in luck: The pros at One Hour Heating & Air Conditioning have installed plenty of smart thermostats and they’re ready to share some tips and tricks for your DIY install.
As a disclaimer and precautionary note, if you are not familiar with or comfortable on electrical wiring, it is best to call in a professional electrician, like our sister brand, Mister Sparky Electric, to install your smart thermostat. Please do not attempt to install your smart thermostat if you do not have a general understanding of electrical wiring.
Your Smart Thermostat Installation
Installing a smart thermostat is relatively straightforward. Make sure your home’s HVAC system is compatible with the smart thermostat you have selected. Most models have a compatibility guide available online.
Secondly, a summer heatwave or a winter thaw is not the best time to install a new thermostat. Just in case things go south, it is always smart to save this type of project for the milder times of the year.
Here is a step-by-step guide to installing a smart thermostat:
Turn Off Your HVAC System
Turn off your HVAC system at the breaker panel. Cutting power to the thermostat will reduce the risk of shorting out any components later in the process. If your old thermostat is battery-powered, it may appear to be on. To check, try turning on your system at the old thermostat and make sure your air conditioning or furnace doesn’t kick on.
Remove the Faceplate
Remove the cover of your old thermostat to expose the wiring and backplate. Before disconnecting any wires, take a picture of the connections with your smartphone to remember what everything looked like when properly connected.
Remove the Backplate
This is often one step further than most homeowners have gone before. While many of us have removed the faceplate to replace batteries or hit a reset button, removing the backplate is not a common routine. However, it is a simple procedure, usually as easy as unfastening clips or removing a few screws- which may require a screwdriver.
Install the Smart Thermostat Backplate
Carefully thread all the exposed wiring through the appropriate holes of the new backplate before screwing the new plate down. This step may require a cordless drill to create new, sturdy drill holes in your drywall.
Connect New Wires
Next, install the faceplate by connecting the wires to the appropriate places. This is where your photo or notes come in handy to reconnect the wires correctly. Most smart thermostats feature color-coordinated wires, along with detailed instructions.
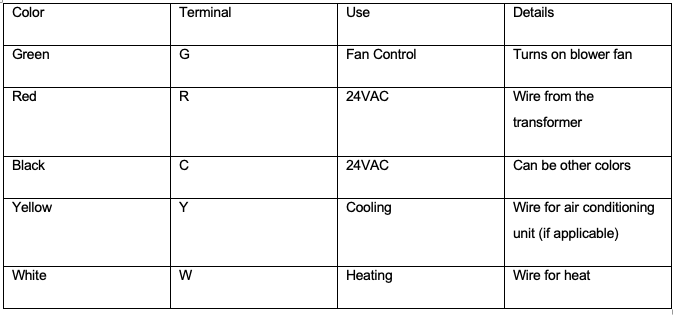
Are the wires of a thermostat universal?
A professionally installed thermostat head unit will follow these basic wiring color codes:
1. Set Up Your Smart Thermostat
It’s now time to begin the start-up procedure. Most smart thermostats walk you through the setup, including connecting to your home’s Wi-Fi network. You may also have the option to download the affiliated app on your smartphone that allows for remote access, wherever you are located.
Is A Smart Thermostat Worth It?
The initial cost of a smart thermostat may give some owners pause. It can be tough to justify replacing your current thermostat when it works just fine but remember being more energy efficient will translate into cost savings in the long run.
It is important to remember that smart thermostats are a step above a programmable thermostat option. In addition to being able to program temperatures to change at specific times, programmable thermostats also connect to Wi-Fi to allow for adjustment from your cell phone.
Smart thermostats, however, allow homeowners to program temperature changes based on when they leave and return, but the devices also learn those habits automatically. For example, it may learn that a homeowner typically leaves for work at 7 am, but can also learn to account for earlier mornings at the gym or late evenings when the kids have soccer practice.
Read more: Top 3 Benefits of Upgrading to a Smart Thermostat
Will a Smart Thermostat Save Me Money?
Smart thermostats are a proven investment. It is important to note that the amount of money they save a homeowner varies for several reasons.
The most obvious is energy use, but electrical rates vary across the country. Weather variables also play a role, with more extreme weather temperatures increasing the amount of money you could potentially save. By automatically adjusting energy use to fit daily schedules and seasonal preferences, a smart thermostat offers improved savings over a traditional thermostat. The opportunities are greater in places with a wide range of weather patterns within a season, such as unexpected chilly summer mornings or warm spring days punctuated with the return of snow.
50% of your home’s energy bill comes from heating and cooling costs, which makes a smart thermostat a valuable tool in lowering expenses. Every home and family is different, but one study found an energy savings of approximately 10 to 12% after upgrading to a smart thermostat.
Need Help with Your Smart Thermostat Installation?
Smart thermostats offer energy savings and insight into your family’s heating and cooling preferences. For help with smart thermostat installation or to get an expert’s advice about selecting the right smart thermostat for your home, contact One Hour Heating and Air Conditioning today!